Showing posts with label DIY. Show all posts

Tuesday, September 11, 2018

DIY Make Up Cleaner Spray


Hello Lovelies,


Welcome back! And if you are new here, welcome 💕💕💕


Today I have a super simply DIY for you - a brushes cleansing spray for those in-between-washes days! Really really easy too - anyone who knows me knows I am all about simple DIYs, with ingredients you already own in your home what could be easier? Just two ingredients (three if you count the spray bottle) - all you need is rose water and tea tree oil! I love Alteya Organics one as it is really pure, and you can tell the difference just by smelling it. If you are on a tight budget, I got you too - just go to your local Asian shop and get food grade rosewater - that will cost you just a bit over two euro, and that's exactly what I used for so many years. If you don't want to or can't use rosewater, you can use any other floral water (try this Alteya Organics Chamomile water perhaps?) that is suitable for your skin. Or distilled water. Plain tap water is not suitable because it will go bad in a few days.
How to do it? Well, it is pretty self explanatory, but if you want me to be specific, here's how - fill 200ml bottle with rose water, add 10-20 drops of tea tree (also known as melaleuca) oil and voila, you are done! Tea tree oil is an antibacterial, antimicrobial, antiseptic, antiviral and many other good things that I won't go into details of, but in this instance it makes it perfect for a purpose of cleaning and disinfecting your make up brushes in between proper washes. I use this spray after every use and clean the brush on the paper towel, and properly wash all the brushes every week. After getting dermatitis (on my face, no less!) I am anal about not getting any bacteria on my brushes or make up for that matter. Why risk infections, right?

One word of caution before you start, please do a patch test to make sure you are not allergic to the tea tree oil, and obviously do not use it if you are indeed allergic! If you find the smell too offensive for your sensitive nose, reduce the quantity to 5 drops. I does smell rather strong. Or add lemon or orange essential oils to it, also the same quantity.
Remember to shake this very very well before each use - oils and water will separate. 

P.s. this doubles up as a refreshing room spray and a deodorant in a pinch (I know I used rose water all over in a sweltering heat in Greece in summer many  moons ago and found myself not needing a deodorant). This would not work for everyday life though. Just wanted to throw the thought out there to make your products work overtime for you :)
And there you have it, your own DIY make up rush cleanser spray! It only costs a few bucks to make and it works great. Now you can ditch those shop bought sprays and save yourself so much money! And spend it where it matters more, for example to buy more make up. Or skincare. Or a scarf. You get the idea :)


Please like and share my posts on social media, it really helps to get the green beauty word out - and you will forever have my gratitude!


Follow me on

 Facebook and YouTube. 


Lots of Love,
Renata.


Enjoy my content? I would appreciate any  tip into my PayPal Tip Jar - any donation will get You my eternal gratitude and more awesome green beauty reviews Your way. I weed out all the greenwashing products so You won't have to.


Thursday, January 18, 2018

My little beauty hacks


Hello Lovelies,


Welcome back! And if you are new here, welcome 💕💕💕

green life in dublin
My little beauty hacks


So I was commenting on someone's request on Love Lula's Facebook Group, where the person wanted to know what beauty hacks people use, and as my comment was getting rather long, I thought why I don't blog about it on my own? And it seemed apt for the Beautiful New Year Challenge I am doing at the moment, so it was the perfect reason to go on and lay all my cards on the table. So I am spilling all my (cheapskate) beans and I hope you will find it interesting and/or useful.

You guys know I am all about saving money where I can, DIY-ing what I can (only with simplest ingredients you already have, promise!) and generally speaking finding new uses for the products I already own gives me a buzz! And if that eliminates buying one or two products, then so much better! Or over 25 in my case (post here) - trust me to take "5 Products I can Live Without" tag and run with it 😉


green life in dublin


DIY Liquid Eyeliner

green life in dublin
DIY Liquid Eyeliner

Did you know that you can create your own liquid liner from your black (or any other colour) eye shadow? I have a post on it here, but it is really simple - just wet the brush, dip it in the shadow and apply. Depending how long wearing and how pigmented your eye shadow is, you can totally get away not buying liquid liner at all! I love a cat eye, but I suck at it still, plus I don't have time for it in the mornings, so I find my liquid eye liners dry up or go bad on me most of the time, way before I have a chance to finish them up. And as they are not the cheapest make products (seriously, if you happen to know good AND cheap liquid liner that wouldn't crumble away after a few hours, do us all a favour and let us know in the comments below!), I don't always have it, and when I don't, I know I can rely on this trick. A single pot of black shadow shouldn't break the bank, and mine has lasted three years with no end in sight. I got mine for 3€ in the bargain bin of TKMaxx beauty section (Bellapierre, if you want to know. It was opened and probably swatched, so therefore reduced to next to nothing, but I figured since it is loose mineral powder, not a lipstick or mascara, there was little risk of contamination, so I took a chance). Make sure to read my Green Beauty Finds in TKMaxx post, one of my worst kept secrets ya all! With 80+ photos to boot. Yep, I like working hard on my posts.


Oil/ balm highlight

Running out of cream highlight  or not big on them at all? No worries at all - all you need is a bit of coconut oil (or a balm) on top of your cheeks for the most beautiful and natural glow. I learned this trick from a magazines from a make up artist. This won't work as your inner eye corner highlight, mind you.


green life in dublin

Coconut oil scalp mask

In all honesty, I never buy scalp masks, it is all too easy to DIY with coconut oil. I usually add a few drops of rosemary essential oil, as it is amazing for the hair, and of course you can add any other ingredients that are good for the hair too, like honey, and raw egg, etc. I don't, as I sometimes leave this scalp treatment overnight, as I can imagine egg or honey wouldn't work too well in this case :)


green life in dublin


Hair spray or leave in conditioner or balm as a brow tamer

Pretty much self explanatory.


green life in dublin
 

Concealer as an eye shadow primer

As someone who wears make up so infrequently, I never buy eye shadow primers - that would be a waste of money and another product sitting and expiring slowly on me. From the blog review I gather not all of them are good or even decent, so I have zero desire to go on "the perfect eye primer" journey. I use concealer as an eye primer on the days I decide to go all out with an eye shadows, and I am happy with it. 


green life in dublin


Tea tree oil for spots

Specific acne products of any kind is something I give a miss for nearly ten years now, plain old tea tree oil is something that works like no other. For obvious reasons don't use near eyes and mouth, and use it on the pimple ONLY and not the skin around it - tea tree oil burns are real, and I don't want you to experience them!


green life in dublin

 
Beetroot or raspberries stain/lip stain

If you are on a strict budget, a true minimalist or are simply running out of your blush or lip products, you can use simple plain beetroot or raspberry as a blush and lip stain. Trust, me, no one will ever know it is not a shop bought product. Simply slice a sliver of a beet and apply with your fingers in a tapping motion, blending quickly. Use the same one for a few days, no need for a fresh chunk every day. You probably will want to eat the raspberry after using it? Or maybe not. Well it is your raspberry, so do whatever you want with it - there are no rules! 
(ps strawberries work too, but only if you have access to very ripe ones, no the "plasticky" kind ones we have in the supermarkets - these don't have a colour, nor smell or taste to them like real thing should have. 

 
green life in dublin


Coconut oil as a eye make up remover

Let me tell you a little secret - I haven't bought a single bottle of eye make up remover for years! I always use coconut oil for that, it removes even the most stubborn mascara as well as other make up, AND conditions my delicate under eye area, as well as lashes. Win win situation if you ask me. Reason #4658 to use coconut oil :)


green life in dublin


Using facial oils or serums and creams as a hand and cuticle "cream" 

Can I tell you another secret? As much as I love hand creams, I don't always have it, and nor I am stressed about it when I don't. I simply use the surplus of facial oils/serums or face creams that didn't work for me as my hand creams.


green life in dublin


Using under eye oils instead of creams to prevent concealer creasing

I use and love under eye oils instead of creams for a couple of years now - for me, they work better. And they don't give me millia like creams do. Another reason I love them, is that they never make my concealer crease, which is often the case with under eye creams.


green life in dublin


Conditioner as a shaving cream 

Gosh, let me spill the last of my cheapskate beans - I use conditioners as a shaving creams. Works great, my skin is never irritated, no razor burns and I am happy to eliminate the need to buy yet another product.


green life in dublin


Your lipstick as a blush/multiple

Let me remind you one very simple and obvious thing that most people seem to forget or don't know - you can use your lipstick as a multiple, depending on the colour, it works great as a blush too. And if you find yourself in a situation with no make up when you need it, you can use it on your eyes too - depending on the colour obviously. I wouldn't rock purple or black all over, but here is a picture of me using Inika Naked Kiss as a multiple on the lips, eyes and cheeks. Not too bad, no? All I need is a bit of darker colour in the outer corner of my eye and I am good to go! That's all your grandmother had, just think about it. Why we can't use it too?


green life in dublin
Inika Naked Kiss lipstick used as a multiple


green life in dublin


Manuka Honey Masks

Another hack or DIY if you will, is manuka honey masks, and I have just the thing for you - a blog post where I provide you with 12+ of different variations of it (here). If you are into green beauty, I am sure you are aware that masks tend to fall into two main different categories - clays and honey based. When you read the description of them they promise you all kind of wonderful things for your skin, brightening, plumping, nourishing, etc etc - and soon I started wondering, how much of these benefits are coming from the honey itself? Sure, many of those masks have wonderful ingredients added to them, but then there is me thinking maybe I don't need to spend 35 to 90 (and upwards) dollars/euros a jar to get the benefits. So what I did was, I got a jar of manuka honey at a very good price (I always watch deals like a hawk, mind you!) and brainstormed many different kinds of masks, with simplest ingredients you already have in your kitchen - all to be found in my post here. I worked hard on it, and I liked it :) Btw, some people have objections or doubts about manuka honey, or it's price point, and I have to say, you don't have to use manuka, local raw honey is your next bet. I explain my reasons for using manuka in that post, besides, when I see that the 250ml tub is lasting me well over a year, the 20+ euros I spent on it seems worth it. And let me remind you, you get 250ml, not measly 30 or 50 as it is the case with most shop bought masks!


  If you are interested, you can see all my DIY posts here.


So that is all for now - although I am sure I am forgetting a trick or two! In the case I will remember it later, I will add them on. And I know your tricks too, very curious to know and learn them! Please leave them in the comments below, or on any social media. thanking you in advance 💕


Lots of Love, 
Renata.

green life in dublin
Green Life In Dublin

Enjoy my content? Any contribution to my PayPal Tip Jar -  will get You my eternal gratitude and more awesome green beauty reviews Your way! I weed out all the greenwashing products so You won't have to :)

Tuesday, January 2, 2018

DIY Facial Steam


Hi Lovelies,


Welcome back! And if you are new here, welcome 💕💕💕

 
DIY Facial Steam


How are you all doing? Hope life is treating you well?

Today I am coming at you with a quick DIY post - a facial steam, that is! As with facial masks, I am so late on the facial steam train. It's mainly to do with childhood memories and those horrible Vick's type of steams when you are sick! I was kinda scarred for life. So when the facial steam trend rolled around a year or two ago, I was like nah, thanks, I will pass! Especially when I looked at prices of them, around 35 to 50 dollars/ euros for a jar or dried flowers? It's a double no from me, thanks but no thanks - you get the idea of my train of thoughts.

Imagine my surprise when I was perusing my cupboards for "Bug Off Colds & Flu!" post, looking at my natural arsenal for not getting sick (not sure if the post will be called exactly like that, but you get the idea. Keep your eyes peeled for it), when I realized I actually own all the ingredients needed for facial steam, and decided to try it on the whim. And you know what, I actually liked it! Who knows, maybe this girl on the wrong side of thirties will actually learn to have some ME TIME and start caring for herself too, not just everyone around her? Anyways, that is besides the point! Let's get back to the post, shall we?

I actually didn't do any of the research on this, nor I perused the ingredients of popular steams, I went with what I had at the moment and what is good for the skin in my opinion. If you are a formulator of natural products or far more advanced than me, please feel free to weigh in with with your opinion and correct me!


Ingredients:

🎕 Linden flowers
🎕 Chamomile flowers
🎕 Lavender flowers
🎕 Elderflowers
🎕 Calendula Flowers
🎕 Red Clover Flowers
🎕 Turmeric root (fresh) (optional)


I must admit I am not sure if red clover flowers are a good addition or not, but I have it, so I might as well use it, right? Now that I am thinking of it, you might add green or puerha tea to it, rooibos should work well too and/or a drop of frankincense or rose essential oil, but those things are not necessary, they are a nice addition, but the steam will work perfectly fine without them. I am just giving you a couple of more options.


Directions:

We all know how to do a facial steam, but if you don't, you simply make a strong tea out of the herbs by pouring a litre of boiling water on four or five handfuls of herbs. I use wide stainless steel mixing bowl, but any bowl will do fine. When the mixture cools down slightly (you want it to be hot, but not boiling hot!), you take a towel, cover your head and lean down into the bowl for as much as you can bear it, for 15 minutes or so. The steam will open the pores and the herbs will do their magic in healing and moisturising the skin. 
I follow up with a face mask or serum. I also save the liquid minus the herbs for final hair rinse or use it as a face spritz for a next day or two. (no more than two days, and refrigerate overnight). It is all about saving and making things last here in Casa De Green Life In Dublin :) The last tip about using it as a face refresher is probably useless now that we are facing Autumn and Winter, aka The Sickness Season as I call it, but if you are a lucky duck living in a hot country reading this, then a) I envy you! and b) please remember this concoction has to be used within a day or two at the maximum, as it has no preservatives and is water based! Safety always!


 All the herbs were foraged either by me or my mom or bought in the health shops. But I believe even if you were to buy all the herbs in the health shop or online, it would still be way cheaper than a shop bought version. And you can also use herbal tea bags too, nothing wrong with that! Feel free to skip ingredients you don't have or don't want to purchase, the beauty of this steam is that you can skip any part or two of it, and it will still work. So take that camomile tea bag, add a couple of more of your chosen herbs to it and off you go girl :) Treating yourself feels so good, right?


So that's it for today's post. Have you tried herbal steam for your face?  How did you like it? Please share, I would love to know.

P.s. Please make my day and subscribe and share this or any of my blog posts on social media. Thank You! It really helps to get the green beauty word out.

Follow me on my new blog Greenlifeindublin.com, Instagram, Twitter, Pinterest, Facebook and YouTube.


Ta Ta for now!
Lots of Love,
Renata.

Find all the reviews and DIY posts I've done to date here.


Enjoy my content? A  tip into my PayPal Tip Jar -  will get You my eternal gratitude and more awesome green beauty reviews Your way! I weed out all the greenwashing products so You won't have to.

Monday, October 23, 2017

DIY Deodorant Recipe


Hello Lovelies,


Welcome back! And if you are new here, welcome 💕💕💕

DIY deodorant recipe - super simple and easy


Hmm, where do I start? Long story short is that after growing tired of wasting money on natural deodorants that just don't work, I started DIYing it. That was a good few years ago and I haven't looked back since! What's more, I've successfully converted my non-natural friends to it too - and although it is super simple and cheap to make, they are coming back to me every time they run out :) I don't mind. You too can make a batch that will cost you less than a fiver if you were to buy all the ingredients, and even less if you have them at home already! And I can pretty much guarantee that you do, because all you need is only three common household ingredients. I actually feel kind of like a fraud posting such a simple recipe, but there have been countless questions about what I use for deodorant on my social media, followed by the requests for a recipe. So after few years of repeating myself over and over on Instagram, I realized I never actually blogged about it, hence for this post right here. As you probably know, I am big on DIYs and one of my favourite pastimes is perusing ingredients of popular green beauty products and then trying to recreating them at home. (see my DIY Manuka Honey Masks post here for another super-easy DIYs example. Over 14 recipes, you will love it!) Pretty much, if I can make it and it’s effective, I’d rather DIY it. But it has to be fairly easy. If there are too many ingredients or too many steps, I’m not likely to try it out. I know you can make pretty much anything you want or need, including make up, but at the same time I only want to have what I am actually using (see my minimizing and downsizing post if you want to), so I haven't slid down much further down the DIY rabbit hole, and I don't want to purchase & have too many ingredients either if they aren't going to be used much and will sit there slowly collecting dust and expiring. 

This DIY deodorant is used much, every day in fact, so I'd like to pat myself on the back for saving environment and a few bucks by doing so too :) I don't claim to be original creator of the recipe as it was found somewhere on Pinterest more than six years ago - if you are the one who did invent this, please come forward so I could pay my respect for you.
One little warning or disclaimer if you will before we start - this recipe contains baking soda or sodium bicarbonate in it, so if you know you are allergic or in any way sensitive to it, DO NOT make this! The rest of us, I recommend doing a patch test for 24hrs too - apply this mixture somewhere else on the body, like a crook of your arm or the back of you knee - and watch for any changes for 24hrs. If any redness or anything at all appears, do not use this recipe either. If not, be my guest!
The reason I am putting this disclaimer out there before the actual recipe is because a lot of people are sensitive to baking soda, including my own daughter - she actually got an alkaline rash when she tried this concoction of mine, and that put her off green beauty for a few years altogether.  Can't say I blame her. For those of you who are sensitive or allergic I am sorry in advance, I do not have a baking soda free DIY recipe, but I believe there should be some out there. Look into magnesium as a baking soda replacement - at least that's what I would do.

So, after long and boring disclaimer, shall we crack on? As I said the recipe is really simple both in terms of ingredients and time-wise too - you will only need three simple ingredients and two minutes of your time!


Diy deodorant


What you will need:

✅ Baking soda, or sodium bicarbonate (aluminium free)

✅ Arrowroot powder
(you can sub it for cornflour if you don't have it, but arrowroot powder has natural deodorising properties to it,which is why is used in DIY dry shampoo recipes too)

✅ Coconut oil 

✅ Spatula, bowl and pretty glass jar. Or some other container to store it in.


Instructions:

It couldn't be simpler - mix equal parts of baking soda and arrowroot powder in a bowl and add just enough coconut oil to make it into a paste. Mix well and pour into a glass jar.
This is the bare bones of the recipe, and if it is your first time making it, I would suggest you go small, like a teaspoon of each of the dry ingredients, and half a teaspoon of coconut oil. Even this amount will last you a week if not more, and in that time you will definitely know if you like it or not. Experiment with the quantities of each ingredients, because what is right for me, might be not quite right for the next person. Although it is a fine line to thread -add too much of the baking soda and you will get a alkaline rash, add too little and it won't work. I find this 50/50 proportion is what works for me. This was pretty much confirmed when I gave it to one of my friends who happened to be moving furniture on that day, and she rang me in the evening gushing about my deodorant - she said after full day of renovations and moving heavy objects she didn't stink at all at the end of the day - and given that she only used non natural deodorants to date, this was a music to my ears! I can confirm this too - I used to cycle six kilometres for my daily commute, day in and day out, and I didn't stink either. 

The beauty of this DIY is that you can customise it by adding your favourite essential oils to it, how much depends on your sensitivity level and the amount you are making. As a general rule, I would recommend 5 drops of pure essential oil (not fragrance oil for the love of God) per 30ml of deodorant. I use less, because I am very sensitive and can't handle much essential oils - my favourite ones are lemon or orange, but you can add anything you like, tea tree would add deodorising properties for sure, but I am not sure I want my armpits to smell like it, so I skip it. Vanilla and rose is a nice combination, and I would suggest you look up popular natural deodorants for smell inspiration? 

Gift idea, anyone?

Oh, and a little tip before we part - if you feel the deodorant is drying out after some time, fear not - just add some more coconut oil and mix well. Problem solved. You are welcome :)


So that is it for now, see you here again shortly. Have you tried DIY deodorant? Would you? Please share your thoughts with me, I would love to know!

P.s. Please make my day and subscribe & share this or any of my blog posts on social media - it helps to get the green beauty word out and for that I Thank You!

Follow me on my new blog Greenlifedublin.com, Instagram, Twitter, Pinterest, Facebook and YouTube. 


Lots of Love,
Renata.


Diy inclined? Even if not, you might enjoy my super-simple-minimal-ingredients-DIYs here. Want to check out my skincare reviews? Click here. Interested in make up reviews? Click here. All my body care and hair care reviews live in this post. You are welcome. 


Enjoy my content? Any contribution to my PayPal Tip Jar -  will get You my eternal gratitude and more awesome green beauty reviews Your way! I weed out all the greenwashing products so You won't have to :)
 

Wednesday, October 18, 2017

DIY Manuka Honey Masks - over 12 Recipes


Hi Lovelies,


Welcome back! And if you are new here, welcome 💕💕💕

Green Life In Dublin
DIY Manuka Honey masks

What if I told you that you can get completely natural mask for your skin, face and hair if you will with multiple benefits for the skin for much less than 30euros/dollars for whopping 250gr? Would you believe me? Well that exactly what manuka honey is! Manuka honey is very different from other honeys and I would highly suggest using this instead of your regular honey, one jar used for masking will last you up to a year used once or twice weekly, so that justifies the price for me. I do have the second jar for eating, but I never put it into the tea (don't put it into hot beverages, ever, because heat destroys those precious enzymes we are after, and with them destroyed it becomes not that different from sugar. So, that's your lesson for the day).

If you don't want to shell out for manuka honey, please feel free to use raw local honey (preferably organic) as your next best bet. Just please do your research on different types of honeys first and then decide. Honey in the teddy shaped plastic jar? Not the best thing for your skin, as it is not only heat treated, it is mixed honey too. Meaning it is only slightly better than sugar, and it is not what you want at all.

If you haven’t heard of it, Manuka Honey is the most unique and powerful form of honey on the planet.  It’s exclusive to New Zealand, created by bees who pollinate the Manuka Bush. But what makes Manuka that much better than your average honey?  It’s all in the nutrient composition.
Manuka honey is known as ‘active’ honey; it has natural antibacterial qualities and proven health benefits. It’s made by bees foraging from the New Zealand Manuka (tea tree) bush. Look for the Unique Manuka Factor (UMF) rating on the jar – the higher the rating, the greater the antibacterial activity. Scientists say it can help ease ulcers and an upset stomach, prevent gum disease, boost your immunity by fighting bacterial infections, and ease skin conditions.
 Raw honey has a multitude of beneficial nutrients: Amino acids, B-Vitamins, Copper, Iron, Magnesium, Manganese, Phosphorus, Potassium, Sodium, and Zinc to be exact.  But in Manuka honey, the density of these nutrients is over four times greater than your average honey, so your body is getting a powerful dose of enzymes that fight inflammation and bacteria and boost your immune system. 
For the skin, a good UMF rating means your skin will receive incredible benefits - the anti-inflammatory quality of Manuka honey is proven to improve skin texture and tone.

Let's leave the health benefits when consumed orally for another post, today it is all about the skin and it's benefits for the skin. Due to it's high anti inflammatory properties this wonderful honey heals and repairs the skin, hydrates, reduces redness and inflammation, plus it oxygenates the pores to draw out bacteria, thus drastically improves acne areas. But wait, there's more to it, manuka honey promotes skin regeneration, repairs cellular damage, and lessens scarring. Because of it's hydrating properties, it is anti-aging - it retains moisture in the skin, which can only be a good thing! It also re-balances the healthy bacteria on your skin. Gives glow. And that is not all, are you ready for it? It helps the skin build collagen and inhibits the bad guys (a group of enzymes called MMP) that destroy the bacteria - isn't that the music to our ears?

So, let's get into my recipes, shall we?

Green Life In Dublin
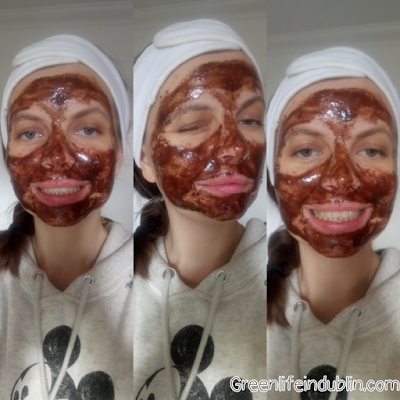
DIY manuka honey and raw cacao mask
Do you see all those brands coming out with some kind of chocolate masks? Me too! I will let you know into one secret of mine, I love perusing ingredients of well known green beauty products and then trying to recreate pared down version of it at home. Well, if you have the ingredients at home already, why go and spend 60+ euros for a jar of it? Am I right or am I right? Coming back to the chocolate mask, you can easily DIY it with just honey and raw cacao powder! Of course you can add more ingredients to it and make it as complicated as you want, I am giving you “bare bones” of a mask, but it is no less effective! Go ahead and eat the leftovers in the spoon! And make yourself some hot chocolate while you have the mask on. Chocolate day anyone? Cacao benefits for the skin: it is excellent for the skin, it boosts blood circulation in the skin when applied topically (so use it in the hair masks too, it reduces hair loss too), thus giving it glow and health; it prevents us from premature aging. Because it contains Omega 6 fatty acids, it heals on a cellular level and provides us with much needed hydration. Cacao has a raw enzyme, which helps in repairing the cell and its rejuvenation. I could go on and on.
Preparation: mix half a teaspoon of manuka honey with the same amount of raw cacao and apply on your face. Keep on for 20-40mins and then rinse with warm water.


Matcha benefits for the skin: with brilliant topical properties, green tea has long been touted as a potent yet gentle antioxidant that's suitable for all skin types. Matcha boasts these benefits and then some - think of the vitamin-packed powerhouse as a highly concentrated mega-dose of goodness for your face Rich in antioxidants, matcha reduces inflammation and works to repair sun damage while calming the skin.
Preparation:
It can't be simpler to do - take 0,5 teaspoon of honey, add a small pinch of matcha, mix and apply on the face for 20mins. 


As we all know activated charcoal is great at drawing out impurities from the skin. You can use it on its own of course, but I mix it with manuka honey for double whammy! Again, this couldn't be simpler - just mix half a teaspoon of honey with one (or half) capsule of activated charcoal and apply on the face for 20-30 mins.


Manuka honey & Hibiscus

Natural botox plant anyone? Step forward hibiscus! With most powerful anti-ageing plant actives, it’s no wonder Hibiscus is called the ‘Botox plant’. Hibiscus has a magical reputation for increasing skin elasticity to give a stunning natural youth-boost. With the incredible ability to inhibit the activity of the enzyme elastase, which is responsible for breaking down our skin’s precious elastin, Hibiscus actively combats the ageing process by firming and lifting your skin. It also evens out the skintone, helps to speed up the cell turnover and some studies claim it reduces large pores. I don't know about this, as I didn't use this mask consistently enough to see it. But I know for sure that hibiscus contains gentle acids that has slight exfoliating properties. 
Preparation: choose organic dried hibiscus petals from your local health shop (edible ones, meant to drink as a tea) and then blitz them into powder with your coffee grinder. Mix with honey and apply. Admire the pink colour and leave on for at least 20 mins.


Be careful with this one if your skin is super sensitive like mine, use just a tiny bit of the cinnamon and do a patch test first. Cinnamon is a great addition to the face masks because it increases the blood flow to the skin and that can only be a good thing. Add a bit of sugar for that exfoliation goodness and you’ve got yourself a poor man’s version of Leahlani Honey Mask!
P.s. honey and cinnamon mixture is also very good for spot treating! Leave it for as long as you can, overnight is ideal.


Manuka honey and organic neem powder

I wouldn't suggest eating this of the spoon, haha! Neem is a amazing herb with many benefits to it, today we will look into its benefits to the skin only, but it has many and many uses. Neem leaves have antibacterial, antifungal and antiviral properties and hence they are quite effective on skin infections. They also soothe irritation and reduce inflammation without drying the skin. Neem is also antiseptic, antibacterial and antiviral, as well as antifungal, and that lends to myriad of health properties, which is too wide to get into here. Let's just say it is good for acne, skin inflammation and redness and so much more.
Prepare and use in the same way, just use 0.25 of teaspoon of neem to start with, it is very powerful stuff.


Vitamin C is amazing for the skin! Not only it does promote the collagen production (this fact alone makes me want to use it straight away), protects skin from sun damage, speeds up healing and reduces skin discoloration; but it also improves skin's moisture and hydration levels and thus keeping the skin looking younger, all while being brighter and healthier looking. It also speeds up healing and reduces inflammation, and all that is a music to my ears! Music to my ears!! And what's more, it stays on your skin for up to 48 hours still doing it's goodness. It goes without saying you want to use pure form of it, without added sugar and sweeteners! Mixing it with honey makes sense if you want your mask to do multiple things at once, and your skin will be left happy! Note - this combo is fabulous for fading hyperpigmentation and scars over time. Another note, don't overdo it if you have sensitive skin like me, I just add a little bit to half of teaspoon of honey.
Prepare and use in the same way. Crush the vitamin C if it comes in tablet form like mine does. Or use some sort of natural berries superfood powder rich in vitamin C - like camu camu or baobab, acai powder, etc?


Clays are amazing for the skin, and each type of clay will have it's own benefits, so please choose according to your skin type. I find pure clay masks much too drying on my skin, so mixing it with manuka honey is like pure heaven to me, not only my skin detoxes but it hydrates at the same time, fabulous or what? Choose clay according to your skin type and mix with honey for pampering mask. With honey's hydrating abilities you won't have to constantly spritz your face to keep it moist. (if you are a clay mask lover and you let them dry on your face, keep in mind you are not fully benefiting from the mask as the active ingredients work only when the mask is wet)


Green Life In Dublin
DIY manuka honey and spirulina/chlorella mask


Want poor man’s version of Leahlani Mermaid mask? Mix manuka honey with spirulina and/or chlorella or mixed greens and ta-dah! I call it Shrek mask not a mermaid mask though. Spirulina benefits to the skin: it reduces dark circles. Anti-aging. Tones and cleanses the skin. Brightens the skin. Helps with acne. I could go on.
Chlorella benefits to the skin: similar to the spirulina benefits. You can always do your own research if you are dissatisfied with my answer? Both of them are amazing for the skin in short. Use in the same way.


Of course you can use regular milk powder too, it will have slightly different benefits, but since I am dairy free, coconut it is for me! If you know me for any length of time, you know that I love anything coconut! Coconut milk powder benefits for the skin: as it is packed with vitamins C, E, B1, B3, B5, and B6 as well as iron, selenium, sodium, calcium, magnesium and phosphorus, it can only be good for your skin! It is incredibly nourishing and conditioning (again, try it as a hair mask too), it prevents acne, treats sunburns, prevents premature aging, moisturises and aids in many skin conditions, including rosacea, dermatitis and eczema. It can help treat the skin by removing the harmful bacteria. Once again, take 1 teaspoon of manuka honey and half a teaspoon of powdered coconut milk.


Manuka Honey & probiotics
I am not kidding you! Just go into your favourite green beauty online store and type in "probiotics" and it will cough up a whole range of probiotic skin care products, so why not DIY it? We all know probiotics are all the rage right now, we are finally discovering we have billions & trillions of good bacteria not only inside us, but also on the skin, so why not support those good guys? Just open a capsule of probiotics You are regularly using, mix with some manuka and voila!


Manuka & maca
Again, not kidding! Mask products with maca do exist (some with such a simplistic formulations that you wouldn't believe) so why not make it on your own, especially if you already have maca in your home?
Maca helps to reduce the effects of ageing, and gives new strength to the skin and stimulated collagen production in the skin. I am sold, don't need to hear any more :)


Manuka honey and Blackstrap Molasses (organic and unsulfured only)

Blackstrap molasses is the thick, dark syrup produced when the sugar cane plant is processed to make refined sugar. This type of molasses contains all the vitamins and minerals which were absorbed by the plant from the soil, but which didn’t quite make it into the end product of nutritionally devoid white sugar!With a robust flavor, and loaded with nutrients, blackstrap molasses boasts a wealth of powerful health benefits. In tests comparing the antioxidant content of several sweeteners including refined sugar, corn syrup, agave nectar, raw cane sugar, maple syrup, brown sugar, honey and molasses, it was found that dark and blackstrap molasses had the highest markers for antioxidant activity. Antioxidant and antiinflamatory benefits? Yes please! Blackstrap Molasses can be used as a mask on it's own, so if you want to, you can skip the honey in this recipe, but bear in mind it is very thick and gooey (and a bit difficult to apply) so you will need to add aloe vera gel, or rosewater or something to thin it out. Benefits for the skin include acne treatment, toning and firming the skin, feeding the skin with nutrients and preventing wrinkles. Sounds good, no?
I mix equal amounts of both molasses and honey and leave on the skin for about an hour. You can do 10 minutes of you are short on time, it still will give you benefits!


Green Life In Dublin
DIY manuka honey and turmeric mask

Whaaat? This staining spice, I hear you cry!? Yes, and yes! Please hear me out. Turmeric is actually a very good thing for your skin, and I have come to love skincare products with turmeric in it, so why not to boost it a bit further and use turmeric in a face mask? As we all know, turmeric is a powerhouse when it comes to your health, and that extends to the skin, benefits include: antibacterial and anti-aging action, brightening of the skin and lightening of pigmentation, improving skin's elasticity, healing acne and scars just to name a few.
Again, use the same way as described previously, half a teaspoon of honey and a pinch of turmeric, either grate fresh or use dried. Keep for 20mins and then rinse off. If you fear about stained skin, I have just the tip for you - you can easily remove it with yogurt! If you are dairy free like me, fear not too, use toner or rosewater. I haven't had any issues with staining using those. If you are still worried, I suggest trying this mask on your day off when you don't plan to leave the house, but you will be fine, trust me!


Side note - let's not forget that you can also wash your face with honey, so if you want, you can also try that. I personally found it too messy, and as I have some fabulous face cleansers at the moment, I kind of left it off. However, never the one to give up on the good stuff, I shall try again, once I will finish all those products I currently own.


My idea for all of these DIY masks came when I started perusing the ingredients of all these wonderful masks in the green beauty world, they all tend to be either honey based or clay based (with some fabulous add-in ingredients) and after a while you start wondering whether those fabulous results they promise come from those add in ingredients or from base of honey? Add my uber sensitivity to the mix, and if I get a reaction to the 95€ mask and I have had zero irritations from my own DIYs, it kind of makes it a no brainer to DIY, isn't it? And I promise you, the results rival the shop bought masks. And you can feel good about it, because you know exactly what you are putting on your skin AND saving yourself big bucks!


So there you go, ten twelve fourteen honey mask ideas for you. And I've got one more - you can also mix coconut oil with honey for face masking providing it does not break out your skin! That is a mask from one well know truly natural skincare brand, I am not making this up! You can use any other facial oil too, my favourite is rosehip. You probably have at least some of these ingredients in your kitchen cupboards already, so why not give it a go? on your marks, ready, set, go!

Happy masking my lovelies.


Don't forget to leave your thoughts about the recipes and masking experience in the comments below.

P.s. Please make my day and subscribe & share this or any of my blog posts on social media - it helps to get the green beauty word out and for that I Thank You!

Follow me on my new blog Greenlifeindublin.com, Instagram, Twitter, Pinterest, Facebook and YouTube.


Lots of Love,
Renata.


Green Life In Dublin

Want to check out my skincare reviews? Click here. Interested in make up reviews? Click here. All my body care and hair care reviews live in this post. Diy inclined? Even if not, you might enjoy my super-simple-minimal-ingredients-DIYs here. You are welcome. 

*sources:
https://www.ncbi.nlm.nih.gov/pmc/articles/PMC3158815/
 https://en.wikipedia.org/wiki/M%C4%81nuka_honey#Research
and my independent research from various other sources.